Showing posts with label recipes. Show all posts

June 4, 2012

BBQ Chicken Pizza on the Grill

A great way to cook during the heat of summer or in a power outage is on your BBQ grill. In addition to the traditional grilling you can do, you can also cook pizza on the grill :) Here is a recipe from Pampered Chef for pizza on the grill:

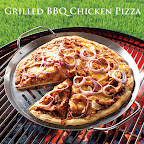
Grilled BBQ Chicken Pizza

Ingredients:

1 small red onion
2 garlic cloves, peeled
2 cups shredded
cooked rotisserie chicken
1 cup barbecue sauce, divided
2 tsp finely chopped fresh oregano leaves
1/2 tsp coarsely ground black pepper
Cornmeal for dusting
1 lb pizza dough
6 oz Colby Jack cheese, grated
Additional fresh oregano leaves for garnish (optional)

Directions:

1. Prepare grill for indirect cooking over medium-high heat. Slice onion crosswise and separate onion slices into rings. Slice garlic. Combine chicken, 1/2 cup of the sauce, oregano and black pepper in small bowl; toss to coat.

2. Generously sprinkle a pastry mat with cornmeal; place dough onto center of mat. Roll dough into a 12-in. circle. Place dough onto BBQ Pizza Pan, gently stretching to cover bottom.

3. Spread remaining 1/2 cup sauce evenly over crust to within 1/2 in. of edge. Top with chicken mixture, garlic and onion; sprinkle with cheese.

4. Place pizza pan on grid of grill. Grill, covered, 18-22 minutes or until crust is deep golden brown, carefully rotating pan occasionally. Remove pizza pan from grill. Sprinkle pizza evenly with additional oregano, if desired. Remove pizza from pan; cut pizza into 12 slices.

Yield: 6 servings
Nutrients per serving: (2 slices): Calories 430, Total Fat 16 g, Saturated Fat 7 g, Cholesterol 65 mg, Sodium 730 mg, Carbohydrate 50 g, Fiber 1 g, Protein 24 g

Cook’s Tips: For easier rolling, let pizza dough stand at room temperature for 20 minutes before rolling it out.
© 2012 The Pampered Chef used under license.
www.pamperedchef.com

P.S.  I recently bought the Pampered Chef BBQ Pizza Pan and I LOVE it!!

July 31, 2011

Cooking with Grains

There is a new television series on called Fusion Grain Cooking with Chef Brad. Chef Brad dedicates each episode to a single type of grain and shows multiple ways to use each grain. I love it! So far he has episodes on wheat, popcorn, rice, buckwheat, spelt, quinoa, farro, millet, barley, amaranth, teff, and kamut. He is also making a couple of holiday cooking shows using whole grains which will air this fall. The show airs on BYU TV and can also be seen in entirety on BYU TV's website HERE.

Chef Brad's website is an excellent resource as well. He tells all about individual grain types as well as listing recipes, including those from his show. I've made a few of his recipes and enjoyed them. You can access his grain education section HERE, and his many recipes HERE. The recipes specifically from his cooking shows can be found HERE.

November 21, 2010

Pressure Cookers - Your Grandmother's Microwave

Pressure cookers are NOT the scary things they once were, but they ARE just as quick and easy. We had a class earlier this month to learn the basics of using a pressure cooker and I had a lot of fun trying some new recipes! I originally bought my pressure cooker to cook dried beans and until recently, that's all I've used it for. Now I've realized how easy it is to cook all kinds of things - even frozen chicken breasts and meatballs.  And it makes wonderful, easy risotto.

Using the pressure cooker uses less energy since the actual time the stove is on is less.  This is great for everyday use, but it would be even more helpful is you were trying to conserve energy during an emergency situation.  It is also a very nutritious method of cooking since the food is cooked quickly, maintaining more nutrients.

There is a printable handout HERE that covers the background of pressure cookers, what to look for if you're planning on buying one, resources for information and recipes, and some recipes that I've tried and liked. My favorite cookbook for pressure cooker recipes is Pressure Perfect by Lorna Sass. It gives wonderful background information on how to use a pressure cooker and great recipes with lots of variations. There aren't any photos in the cookbook, but I still highly recommend it and I've included a few of her recipes in my handout so that you can get a glimpse of how well I think it is written.

October 11, 2010

September/October Preparedness Newsletter

I realize it's already halfway through October, but I'm finally getting around to posting the September/October Preparedness Newsletter. You can access a printable copy HERE. This newsletter includes articles on
  • "Rotate" is not a Swear Word!
  • Food Storage - You're Already Doing It
  • 72 Hour Kits
  • Homemade Non-Toxic Cleaners
  • Tips for the Fall Garden
  • Recipe for "Microwave Caramel Popcorn" - only 3 ingredients plus the popcorn!
  • Essential Non-Food Items
  • Water Storage
  • and more!

July 4, 2010

July/August Preparedness Newsletter

If you didn't get a copy of the July/August Relief Society preparedness newsletter, you can access a printable copy HERE. This newsletter includes articles on
  • getting your food supply organized
  • hurricane preparedness
  • community gardening classes coming up
  • recipes
  • and more!

May 23, 2010

May/June Preparedness Newsletters

If you didn't get a copy of the May/June preparedness newsletters, you can access a printable copy of the Relief Society newsletter HERE. This newsletter includes articles on
  • gardening in Texas in June
  • places you can pick fruit locally
  • helpful ideas for increasing both your food supply and 72 hour kits for families with young children
  • yummy recipes
  • and more!
A copy of the newsletter geared more towards "The Man of the House" can be accessed HERE. It includes articles on
  • Self-Reliance: It's not just about Food Supply
  • generators
  • hurricane preparedness
  • and more!
We hope these newsletters will be one more resource of ideas for self-reliance and that they might be a spark that will prompt you to action in one way or another.

Summer Recipes & Pick Your Own Fruit

We had planned on including a recipe for basil pesto in the preparedness newsletter, but it didn't fit. You can access a printable copy of the pesto recipe along with the other recipes in the Relief Society newsletter HERE.

Now that summer is here, it's time for fresh fruit and even homemade jam! HERE is a list of places where you can pick your own fruit in our area.

May 5, 2010

Yogurt Making after the Class

I just got some feedback after the first yogurt making class. YOU actually went home and tried to make yogurt. YEAH! A few things ... it may take more than 6 hours to fully incubate especially if not using dry milk. Some yogurt recipes say up to 8 hours. Don't worry! This is why I start yogurt in the morning. Also, if you can stop the incubation process as soon as the yogurt is thick, it is less "tangy." If you want tangy yogurt for use as sour cream, let it incubate longer.

As I was making yogurt this morning for my family, I realized that I use way less than 1/3 cup of sugar. I was estimating when I made my recipe. I use less than 1/4 cup of sugar when I am making it for myself. No wonder the yogurt from class was so tasty! Just know that you can vary sugar or add no sugar to the yogurt. I have also used Agave Nectar, but it does tint the yogurt slightly. To me, the vanilla is essential. One suggestion from class was to try a vanilla/almond flavoring mixture which sounded good to me.

I have another great plan for yogurt - how about mixing it with Ranch Dressing flavor and making a dip? Yum. And HERE are some more ideas of ways to use yogurt.

Yogurt with Church powdered milk: I have been experimenting with using the cannery milk for yogurt to this result - It works great if you use 2 cups dry milk with the 3 3/4 cups water, BUT you CANNOT add vanilla or sugar. Adding vanilla and sugar stops the yogurt process and you will just get yogurt milk!

Also, I have had some feedback that you can incubate the yogurt in your oven with the light turned on. That sounds super easy to me.

Keep me posted on your successes and failures so I can let everyone know.

Paula

May 3, 2010

Yogurt Making

Paula taught a great yogurt making class in her home this morning! She uses the Provident Pantry nonfat dry milk to make it with although you can use other milk as well. But what a great way to rotate your milk supply! And the ingredients are all shelf stable items you can store, including yogurt starter. You can access a handout on her method HERE.

Read the handout for specific instructions, but here are the basic directions:

First, heat the milk to 180 degrees F.


Remove it from the heat and let it cool to 115 degrees F.
Whisk in the starter. You can use the Yogourmet starter


or some yogurt you've saved from your last batch of yogurt.


Optional: At this point you can add up to 1/3 cup sugar and 1-2 tsp vanilla if desired.


Pour into jar(s) and incubate in a yogurt maker


or a cooler for 4-6 hours.


There are many additional methods of incubating as well which are mentioned in the handout.

Enjoy! Yogurt is great plain, mixed with jam, topped with honey or syrup, used in smoothies, and even made into yogurt cheese.

To make yogurt cheese, line a small strainer with a double layer of cheesecloth or a flour sack towel. Place this in a bowl or dish to catch the whey that will drain off. Place the yogurt in the lined strainer and place in the refrigerator (covered lightly with cloth) overnight. The yogurt will thicken and can be used plain like sour cream or seasoned for use as a dip. Bread seasonings make great seasoning options.

April 28, 2010

Recipe Handout from Other Breads & Milk Class

You can get a printable copy of the remainder of the handout from our class last week HERE. It includes the recipes for
  • tortillas
  • other bread recipes
  • English muffins
  • pita bread
  • corn bread
  • a few dairy related recipes
  • and more!
Hope you enjoy them :)

March 28, 2010

Dehydrated & Freeze-Dried Foods

Our class on dehydrating showed us that making our own dehydrated food is easy and it doesn't take as long as I thought. Kelli had some great dehydrating tips which can be found HERE. She has a NESCO American Harvest dehydrator and has been very happy with it. Another brand she recommended was an Excalibur dehydrator. Some of the new convection ovens even have a setting for dehydrating foods (check your owners manual for details). Kelli suggested you look for a dehydrator that:
  • has an adjustable temperature
  • has the fan on the top or on the side
  • is expandable (can add extra trays)
A mandolin cutter can help you cut food pieces thinly and uniformly.

Here are a few websites that give specific instructions on how to dehydrate fruits, vegetables, herbs, and jerky:


You can even make crackers in your food dehydrator! Kelli made some yummy flax seed crackers. She didn't have an exact recipe, but here are some basic directions:

Flax Seed Crackers

1 cup flax seeds, ground (use a coffee grinder or blender)
1 3/4 cup water
seasonings (Parmesan cheese: 1/2 - 5 Tbsp and garlic salt or powder: 1/8 - 1 1/2 tsp; or any other seasonings - you can even add finely chopped or blended vegetables)

Mix the ground flax seeds and water and let sit for 3 or more hours until gelatinous. Mix in seasonings to taste (remember that the flavors will concentrate somewhat as the crackers dehydrate.) Spread mixture as thin as possible (1/4" thick) on dehydrator trays with Teflon sheets. Dehydrate until crisp.
~~~~~
We also talked about the difference between freeze-dried and dehydrated foods. That handout can be found HERE. We then had the opportunity to taste and see the difference in multiple foods. We even tried a few of the Mountain House freeze-dried entrees and they were all quite good. My family uses them when we go camping and they would be wonderful to keep in a 72 Hour Emergency Kit. It would be nice to have a real meal instead of just a granola bar in an emergency.

Here are some photos and thoughts on the food we sampled (you can click on any of the photos to enlarge them):


Pizza from the Pantry

Our Pizza from the Pantry class was a huge success - and delicious too! We even made a pizza with one half grated cheese that had been frozen and the other half rehydrated freeze-dried cheese. We couldn't tell the difference! They both melted equally well and tasted great :)

Here is a wonderful pizza dough recipe from Joeby. Click HERE for a printable copy.

Pizza Dough

1 cup warm water
1 package yeast (2 1/4 teaspoons)
1 teaspoon sugar
2 tablespoons vegetable oil
2 ½ cups flour
1 teaspoon salt

Dissolve yeast and sugar in warm water. Stir with a fork and set aside for 10 minutes, or until very foamy. Add oil to yeast mixture. Combine flour and salt in a bowl and pour yeast mixture over and mix thoroughly. Let rest for 5 – 10 minutes.

Roll dough out onto an oiled pizza pan (or cookie sheet, etc.) or roll out onto a pizza stone. (I put a little corn meal under the crust - as I roll it out - to keep the pizza from sticking and it gives the crust a great crunch.)

Add your choice of topping ingredients (be creative!)

Bake in a hot 425 degree (preheated) oven for about 20 minutes. I usually start checking at 15 minutes. The type of toppings really makes a difference in how quickly the pizza browns.

Joeby made many creative pizzas, but my favorite was one with pesto, roasted red bell peppers, and diced tomatoes. It was delicious! All the toppings were from jars or cans since we were trying to use only shelf stable items, but of course you can use fresh ingredients when available.

February 18, 2010

Using Sprouts as a Food Source

Our class on sprouting was very fun and informative. Why sprout? There are many reasons to sprout. Some of these are that sprouts provide incredible nutrition, they contain enzymes which aid in digestion, and by using sprouts you can provide a fresh vegetable any time - regardless of weather or circumstances. Handy Pantry Sprouting's website lists the Top 10 Reasons to Sprout HERE.

We gave participants in the class the option of purchasing a Sprouting Kit shown below.


The cloth bag was included so that it could be slipped over the jar for those sprouts that like to be grown without light. This way the jar can still be kept out on the counter where it will be seen and remind you to rinse more often :) A single layer of fabric mesh screen is placed over the top of the jar and secured using the metal band. The additional screen was included for use as a replacement screen.

A basic sprouting guide can be downloaded HERE. This includes a step by step guide on how to grow sprouts in a jar and how to grow sprouts in a tray. It also includes a few recipes and some ideas for using sprouts for those of us that don't know quite where to begin. More recipes from our class (Soft Spring Rolls and Bean Sprout Salad) can be found HERE.

SproutPeople's website is a great resource for details on how to sprout specific types of seeds and beans. Go to their website HERE, scroll down, and click on the type of sprout you want more information on. When the next web page comes up, click on the name of the individual sprout you are looking for. This will give you information on how much to sprout at a time, method to use, length of time, and even some nutritional information on each sprout type.

Here are some helpful websites on sprouting:

January 13, 2010

Beans - More Recipes and Some Great Websites

Sharon found this great handout that has lots more bean recipes and tips. My favorite part is the internet websites listed at the very end of the handout, which I've included below. The first website listed has lots of information including photos of different types of beans and decriptions of their flavor, uses, and cooking times (once you go to the Beans for Health Alliance website, you can access the page with the varieties of beans by clicking on the photo of the beans on the lower left.) Click HERE for a printable copy of the entire handout, including more recipes.

INTERNET SOURCES . . .
(click on each title to go directly to the website)

Bean Recipes

We were able to try lots of yummy bean recipes at our Cooking with Beans class last month. A printable handout from the class with recipes can be found HERE and some additional printable bean recipes can be found HERE.

Canning Beans

One of the things that makes it harder for me to use beans more often is the time and planning it takes to prepare them. I now use a pressure cooker most of the time to speed up this process, but another way that can help is to have some beans already cooked and readily available by canning them. HERE is a handout from the University of Georgia, The National Center for Home Food Preservation that gives a few basic recipes for canning beans and the correct procedure for doing so.

November 22, 2009

Whole Wheat Bread Making Class

We had a great turnout to our bread making classes! The recipe we used is below. (For a printable copy of both this recipe and the entire class handout, click HERE. The handout also includes information about bread conditioners/additives, tips for making whole wheat bread, and health benefits of grains and legumes.)

Favorite Whole Wheat Bread
This recipe makes one 2 lb. loaf and can be made with a mixer or by hand. It can also be doubled with great results.

Combine in bowl:
1 1/3 c. warm water (11 oz)
2 T. plus 2 tsp. oil
2 T. plus 2 tsp. honey
(Check water temp to make sure it is between 115 and 120 degrees.)


Add:
2 c. whole wheat flour
1 T. gluten
1 tsp. lecithin
Sprinkle 1 T. instant yeast evenly over mixture, then stir. Let sit for 10 minutes (sponge.)

Add and mix well:
1 c. whole wheat flour
2 tsp. salt


Continue to add:
Up to one more cup of whole wheat flour. This will require mixing with your hands to work the flour in. At first the dough may stick to your hands, but as you work more in the dough ball will start to clean your hands. The dough should be tacky like a post it note and not so sticky that it sticks to your hands and won't come off. The dough ball will start to feel firm and tacky. You can tell when it is done when the dough does not stick to your floured finger. When enough flour has been added - knead for 5 minutes. Let dough sit for 30 minutes. Cover with dry towel or oiled plastic wrap (this is called a first rise.) Punch dough down and knead for 5 - 7 additional minutes (do window pane test.) Let dough relax for a minute or two while you grease your pan. Pat dough into rectangle and "spank." Roll dough up, pinch together ends, rock it to form a smooth top, place in pan. Smash dough evenly into pan then go around edges with your fingers to make it rounded on top. Cover with greased plastic wrap or a towel. Dough is ready to be baked when it has doubled. Usually takes 20 - 30 mins (shows a good inch or two above the top of the pan.) Lower the rack inside your oven so that your bread is in center of the oven. Sometimes, we have our racks in the center and not the bread. It will bake better this way. Bake in preheated 400 oven for 5 mins. Without opening door, turn oven down to 325 and bake for additional 30 mins. Bread is ready when internal temperature reads between 195 and 200. Turn out hot loaf onto cooling rack.
......................................................................................................................
If you are planning on serving this bread with dinner and don't need the texture to hold up to spreading peanut butter on it, you can skip the second rising and make the bread as follows. This allows you to make the bread much more quickly. You can also leave out the gluten and lecithin if needed, but they do aid in the rising, texture, and shelf stability of the bread.

Combine in bowl:
1 1/3 c. warm water (11 oz)
2 T. plus 2 tsp. oil
2 T. plus 2 tsp. honey
(Check water temp to make sure it is between 115 and 120 degrees.)

Add:
2 c. whole wheat flour
1 T. gluten
1 tsp. lecithin
Sprinkle 1 T. instant yeast evenly over mixture, then stir. Let sit for 10 minutes (sponge.)

Add and mix well:
1 c. whole wheat flour
2 tsp. salt

Continue to add: Up to one more cup of whole wheat flour. This will require mixing with your hands to work the flour in. At first the dough may stick to your hands, but as you work more in the dough ball will start to clean your hands. The dough should be tacky like a post it note and not so sticky that it sticks to your hands and won't come off. The dough ball will start to feel firm and tacky. You can tell when it is done when the dough does not stick to your floured finger. When enough flour has been added - knead for 8-10 minutes (do window pane test.) Let dough relax for a minute or two while you grease your pan. Pat dough into rectangle and "spank." Roll dough up, pinch together ends, rock it to form a smooth top, place in pan. Smash dough evenly into pan then go around edges with your fingers to make it rounded on top. Cover with greased plastic wrap or a towel. Dough is ready to be baked when it has doubled. Usually takes 20 - 30 mins (shows a good inch or two above the top of the pan.) Bake in preheated 400 oven for 5 mins. Without opening door, turn oven down to 325 and bake for additional 30 mins. Bread is ready when internal temperature reads between 195 and 200. Turn out hot loaf onto cooling rack.